
Master boxes / Master boxes
Use of Master Cartons in Picking and Packing
Table of contents
During picking and packing processes, you can use a Master Checkout to register or assign multiple products with a single scan. This streamlines order preparation and packing, reducing labor time and manual scanning errors.
💡 If you have not yet configured your Master Boxes on the platform, please first check the article Master Boxes: Definition and configuration.
Use in Picking
Prerequisites
Before scanning a Master Carton during picking, make sure you have completed it:
- Have the selected orders and active for processing.
- See scanned warehouse area where you are.
Step by step
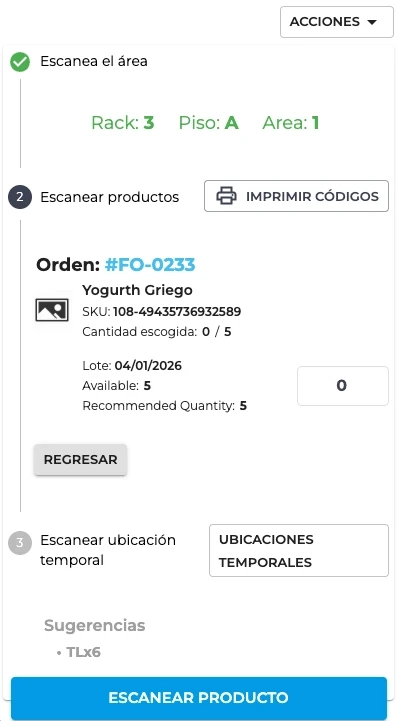
1. Scan the Master Box code
From the product scanning screen, use the bar code reader or the device camera (“Scan product” button) to read the Master Box code.
| Result | System action |
|---|---|
| It is a Master Box | A modal will open with the details of the products contained. |
| Not a Master Box | The code will be processed as an individual product (normal scanning). |
2. Review the content in the modal
The modal displays the following information:
- Master Box Name at the top.
- List of products, with:
- Product image.
- Name and SKU.
- Quantity contained in the box.
Verify that the products and quantities match the physical contents of the box before proceeding.
3. Heed system warnings
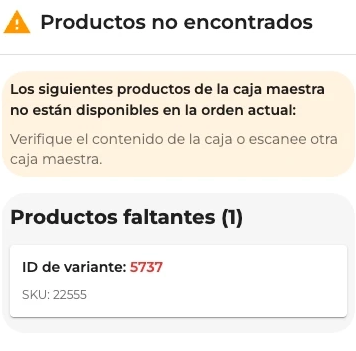
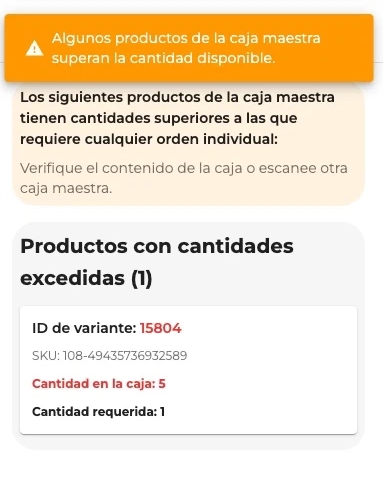
The system can show you warnings in three situations:
Products not found in the area If any product in the Master Carton is not assigned to the current area, a warning modal will appear with the list of missing products. In this case:
- Verify that you are in the correct area.
- Check the physical contents of the box.
- Close the modal and scan a different Master Box if necessary.
Quantities exceeded If the quantity of any product exceeds what you need to picke, the system will show a modal indicating which products have excess quantities. In this case:
- Check if the box is the correct one for these orders.
- Close the modal and continue with individual product scanning if necessary.
Expiration date warning If there are products with a closer expiration date in another area of the warehouse, you will see an orange banner inside the modal with two options:
| Button | Action |
|---|---|
| Continue here | Ignore the suggestion and continue clicking from the current area. |
| Take from the suggested area | Change the context to the area with the nearest expiring products. You will see a blue message confirming the change. |
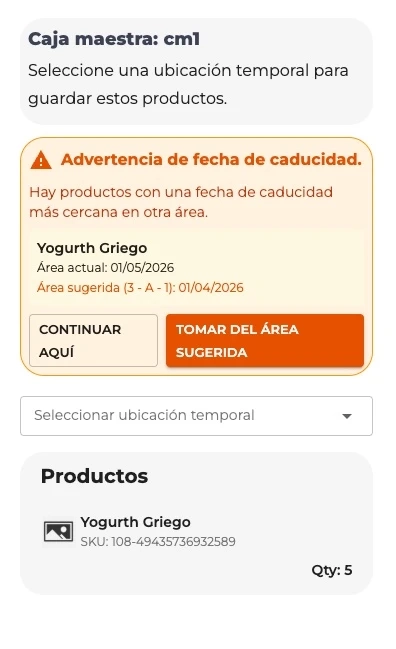
4. Select Temporary Location (TL)
Within the modal, you must indicate in which Temporary Location (TL) the products will be deposited. You have two ways to do it:
- Using the selector: Search and select the TL from the drop-down list.
- Scanning the TL code: Scans a formatted code
TLxfollowed by the number (e.g:TLx42). The system will select it automatically.
Once selected, you will see a blue box confirming your choice (example: “Selected: TL-42”).

5. Confirm Master Box
Press the button “Confirm” to process the picking.
⚠️ The button “Confirm” will only be enabled when you have selected a Temporary Location.
When you confirm, the system automatically:
- Register all products as scanned.
- Assigns them to the selected Temporary Location.
- Sends the information to the server.
- Proceed to the next step:
- If there are any products left to peck in other areas, it will take you to the next area.
- If there are no products left, you will be taken to the completion screen.
If you wish to cancel, press “Cancel” and the modal will close without making any changes.
Use in Packing
Prerequisites
Before scanning a Master Carton during packing, make sure you have:
- A selected order with products pending to be packed.
- A selected shipping carton or a noBox (virtual box without dimensions).
Step by step
1. Select a shipping box
- Scan the barcode on the shipping box, or select it from the drop-down menu at the top of the screen.
- You will see the confirmation: “Aggregate box” (o “Pallet added”).
- The display will show: “Selected: Box N° 1”, indicating that the box is active.
2. Scan the Master Box code
With the shipping box already selected, scan the Master Box barcode using:
- The bar code scanner.
- The device camera (camera button).
3. Automatic product assignment
When scanning, the system:
- Check which products and quantities are associated with the Master Carton code.
- Look for those products within the order slopes.
- Automatically assigns each product with its quantity to the selected shipping box.
- Updates the weight and volume of the shipping box.
Step 4. Verify scan result
Depending on what the system finds, you will see one of these messages:
| Message | Meaning |
|---|---|
| Aggregate product | All products in the Master Carton were correctly assigned. |
| Some products were not found | Some products were assigned, but others do not match the current order. |
| Product not found: [code]. | No product in the Master Carton corresponds to this order. Verify that you are working on the correct order. |
Important notes
- In picking, the button “Confirm” will only be enabled once you have selected a Temporary Location.
- In packing, the assignment is automatic when scanning. No additional confirmation is required.
- If you see the message “Product not found” in packing, verify that the active command is correct before retrying.
- The expiration date warning in picking is a suggestion, not a block. You can choose to continue in the current area.
Was this resource helpful to you?