/ Retornos y devoluciones
Recibir una orden de devolución (Admin y Staff)
Recibir una orden de devolución desde una cuenta de administrador.
1. Acceder a la Sección de Devoluciones
En el menú lateral izquierdo haz clic en “Returns” (Devoluciones).

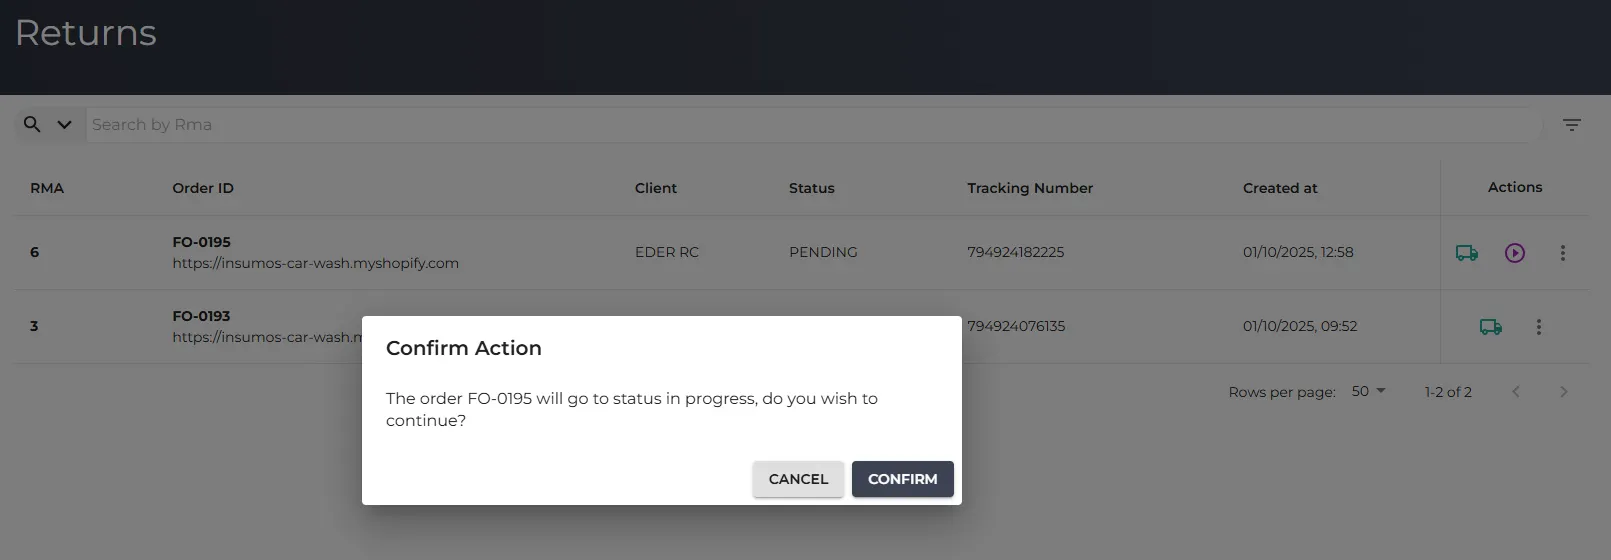
Esta acción te llevará a la página principal de “Returns“, donde verás una lista de todas las órdenes de devolución existentes.
- Identificar la Orden de Devolución Pendiente
- Localiza la orden de devolución que deseas procesar. En la tabla, puedes identificarla por:
- RMA: El número de identificación de la devolución.
- Order ID: El ID de la orden original.
- Client: El nombre del cliente que realizó la devolución.
- Status: El estado actual de la devolución. Busca aquellas con estado “PENDING” (Pendiente).
- Tracking Number: El número de seguimiento del paquete.
- Campo de búsqueda Junto a este campo, hay un menú desplegable (indicado con una flecha hacia abajo). Haz clic en este menú para seleccionar el parámetro de búsqueda deseado. Las opciones disponibles son:
- Rma: Buscar por el número de identificación de la devolución.
- Order Identifier: Buscar por un identificador de orden específico.
- Order ID: Buscar por el ID de la orden original del cliente.
- Tracking Number: Buscar por el número de seguimiento del paquete de devolución.
- Localiza la orden de devolución que deseas procesar. En la tabla, puedes identificarla por:
3. Iniciar el Proceso de Recepción
Una vez que hayas identificado la orden de devolución con estado “PENDING” que deseas procesar, existen dos formas de iniciar el proceso de recepción:
Opción A: Iniciar desde el icono de play.

Opción B: Iniciar desde el menú de “Más Opciones”

Al hacer clic sobre la acción para procesar la orden, se abre un modal de confirmación.
4. Procesar la Recepción y Colocación de Productos
Una vez que has iniciado el proceso de recepción (ya sea a través del icono directo o el menú de opciones), serás redirigido a la pantalla “Receive return” (Recibir devolución).

- Verificar la Orden En la parte superior, se muestra el Order: #FO-0195 para confirmar que estás trabajando con la devolución correcta.
- Selección del rack o racks: Selecciona dónde se van a colocar los productos. Por defecto se preselecciona la ubicación de la cual fue tomado el producto

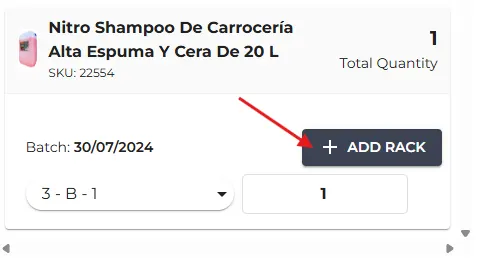
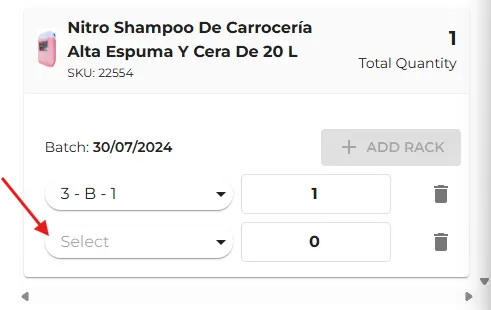
- Colocar el producto en dos ubicaciones distintas: Se puede agregar el producto en más de una ubicación.

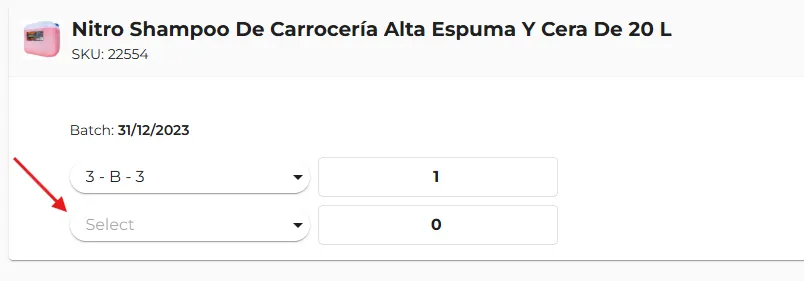
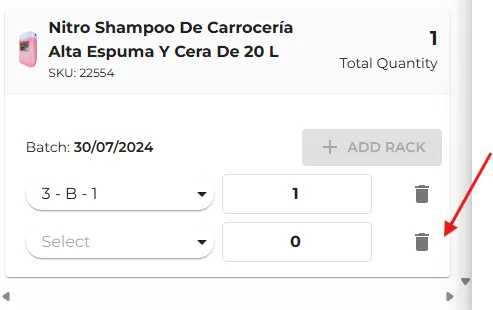
- Eliminar una ubicación Si accidentalmente añades una ubicación de rack incorrecta o ya no necesitas una de las asignaciones, puedes eliminarla.
Para cada línea de asignación de rack y cantidad, encontrarás un icono de papelera (un cubo de basura) en el extremo derecho. Haz clic en este icono para eliminar esa fila de asignación de rack específica.

- Agregar Evidencias (opcional) Te permite añadir imágenes de los productos recibidos. Haz clic en el botón de “+ADD” para subir fotos de los productos, lo cual es útil para cualquier disputa o auditoría futura sobre el estado en que fueron recibidos.

- Completar la Recepción:
Una vez que hayas verificado todos los productos, añadido las evidencias necesarias y asignado cada artículo a su ubicación de rack correspondiente con su cantidad exacta, haz clic en el botón “COMPLETE” en la parte inferior de la pantalla.
¿Cómo recibir una orden de devolución desde una cuenta de staff?
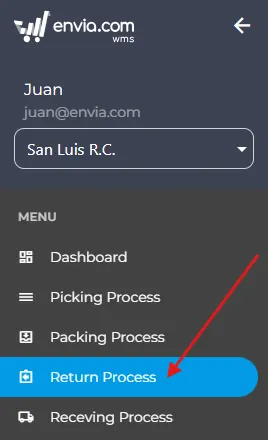
1. Acceder a la Sección de Devoluciones
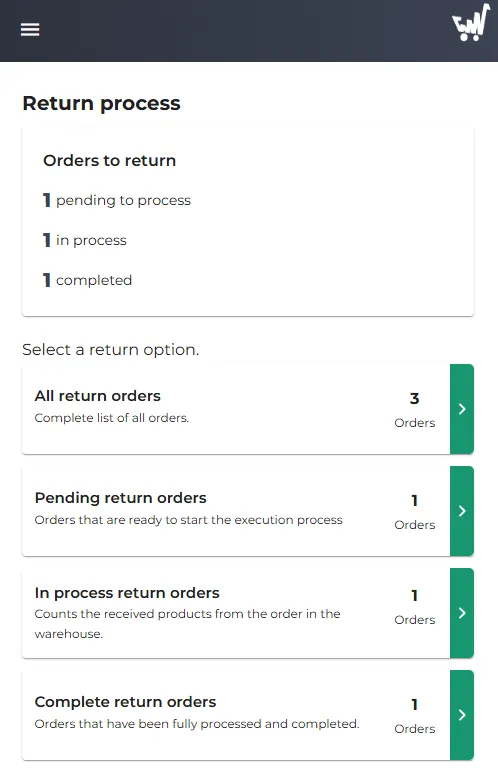
En el menú lateral izquierdo, haz clic en “Return Process” (Proceso de Devoluciones).
- Seleccionar una opción de devolución (Select a return option): Las siguientes secciones permiten filtrar y gestionar las devoluciones según su estado:
- Todas las órdenes de devolución (All return orders): Muestra una lista completa de todas las solicitudes de devolución, independientemente de su estado.
- Órdenes de devolución pendientes (Pending return orders): Órdenes que están listas para iniciar el proceso de ejecución. Estas son las solicitudes recién enviadas por el cliente que requieren una primera acción.
- Órdenes de devolución en proceso (In process return orders): Cuenta los productos recibidos del pedido en el almacén. Estas órdenes están activas y requieren seguimiento hasta su finalización.
2. Gestión de Órdenes de Devolución Pendientes
Esta sección se utiliza para revisar y comenzar a procesar las solicitudes de devolución que han sido iniciadas por los clientes pero que aún no han sido aprobadas o los productos no han sido recibidos.
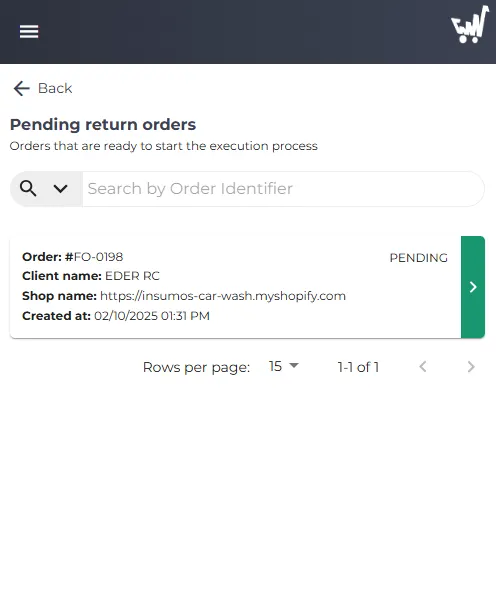
- Identificación de Órdenes: Información visible:
- Order: #FO-0198: El número de identificación único de la orden de devolución.
- Client name: EDER RC: Nombre del cliente que solicitó la devolución.
- Shop name: La tienda de donde proviene la orden original.
- Created at: 02/10/2025 01:31 PM: Fecha y hora en que se creó la solicitud de devolución.
- PENDING: Estado actual de la orden.
- Campo de búsqueda Junto a este campo, hay un menú desplegable (indicado con una flecha hacia abajo). Haz clic en este menú para seleccionar el parámetro de búsqueda deseado. Las opciones disponibles son:
- Order Identifier: Buscar por un identificador de orden específico.
- Order ID: Buscar por el ID de la orden original del cliente.
- Tracking Number: Buscar por el número de seguimiento del paquete de devolución.
- Cada tarjeta representa una orden de devolución pendiente.
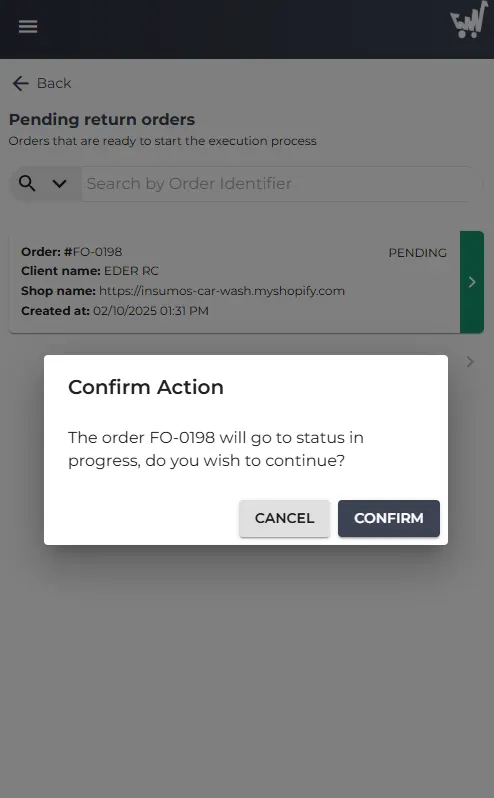
3. Iniciar el Proceso de Recepción
Una vez que hayas identificado la orden de devolución con estado “PENDING” que deseas procesar, existen dos formas de iniciar el proceso de recepción:
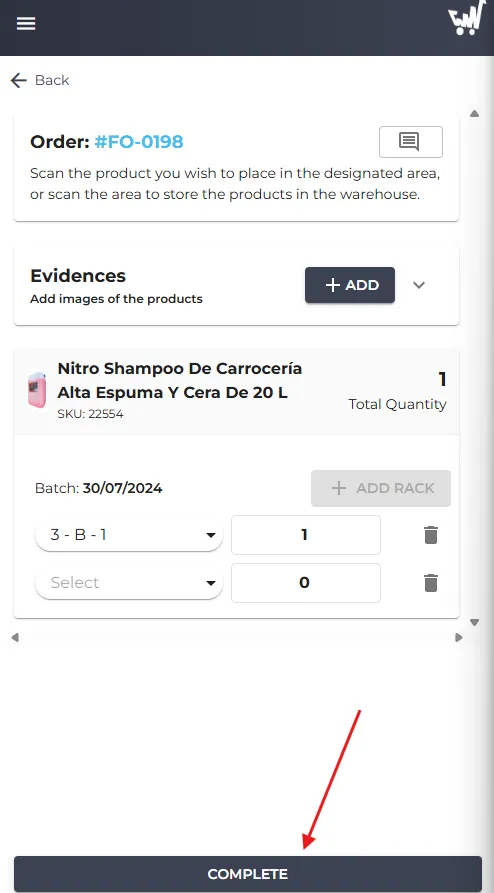
4. Procesar la Recepción y Colocación de Productos
Una vez que has iniciado el proceso de recepción (ya sea a través del icono directo o el menú de opciones), serás redirigido a la pantalla “Receive return” (Recibir devolución).
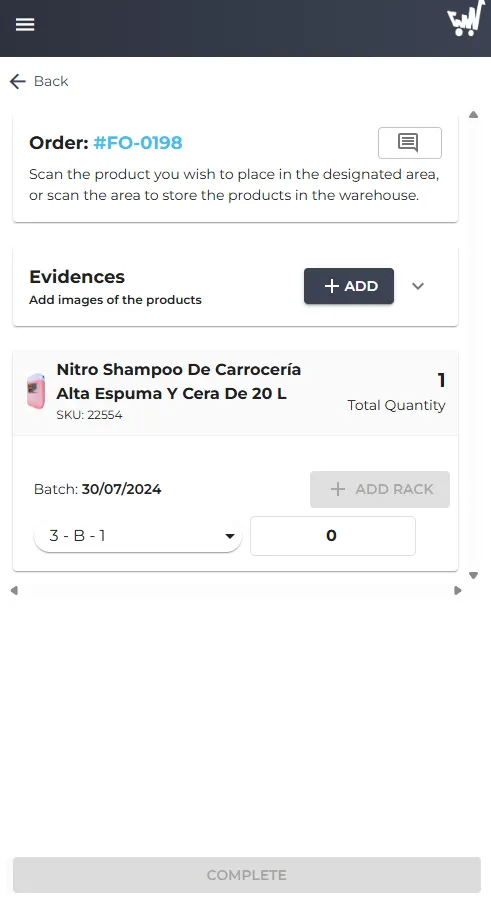
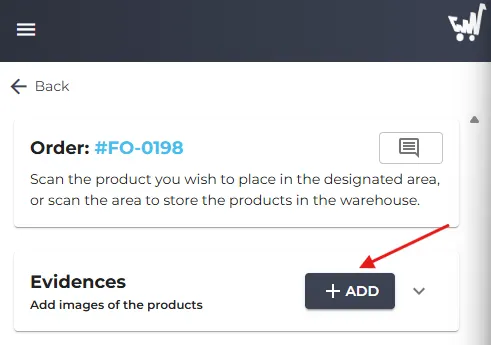
- Verificar la Orden En la parte superior, se muestra el Identificador de la orden (Order: #FO-0198) para confirmar que estás trabajando con la devolución correcta.
- Selección del rack o racks: Selecciona dónde se van a colocar los productos. Por defecto se preselecciona la ubicación de la cual fue tomado el producto
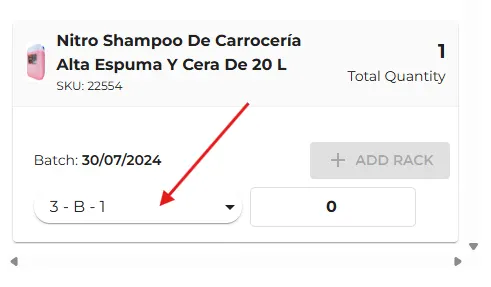
Colocar el producto en dos ubicaciones distintas: Se puede agregar el producto en más de una ubicación.
- Eliminar una ubicación Si accidentalmente añades una ubicación de rack incorrecta o ya no necesitas una de las asignaciones, puedes eliminarla. Para cada línea de asignación de rack y cantidad, encontrarás un icono de papelera (un cubo de basura) en el extremo derecho. Haz clic en este icono para eliminar esa fila de asignación de rack específica.
- Agregar Evidencias (opcional) Te permite añadir imágenes de los productos recibidos. Haz clic en el botón de “+ADD” para subir fotos de los productos, lo cual es útil para cualquier disputa o auditoría futura sobre el estado en que fueron recibidos.
- Completar la Recepción:
- Una vez que hayas verificado todos los productos, añadido las evidencias necesarias y asignado cada artículo a su ubicación de rack correspondiente con su cantidad exacta, haz clic en el botón “COMPLETE” en la parte inferior de la pantalla.
